
Wheelchair Assessment
Original Editor - Naomi O'Reilly as part of the Wheelchair Service Provision Content Development Project
Top Contributors - Naomi O'Reilly, Jess Bell, Stacy Schiurring, Tony Lowe, Simisola Ajeyalemi, Kim Jackson, Rucha Gadgil, Tarina van der Stockt, Vidya Acharya, Amrita Patro, Olajumoke Ogunleye and Ewa Jaraczewska
Introduction
Skilled wheelchair assessment is central to every step of the WHO's wheelchair service delivery model (Select, Fit, Train and Follow-Up), as outlined in the 2023 WHO Wheelchair Provision Guidelines. A comprehensive, individualised assessment provides the foundation for all subsequent decisions about wheelchair selection, fitting, and training. Inadequate assessment is associated with serious consequences, including pressure injuries, postural deformities, pain, reduced function, and decreased community participation.[1] Conversely, systematic assessment is linked to improved quality of life and community participation.[2][3][4][5][6] This page covers the three components of wheelchair assessment: the assessment interview, the physical assessment, and body measurements.[7]
Preparing for Assessment
Building your resource library. Before conducting a wheelchair assessment, it is important to have appropriate forms, tools, and references to hand. Useful resources can be drawn from a range of sources and tailored to the clinical population and setting.
| Resource | Description |
|---|---|
| WHO Wheelchair Service Training Package (Basic and Intermediate levels) |
|
| New South Wales State Spinal Cord Injury resource | Includes templates for the interview, Mechanical Assessment Tool (MAT) evaluation, and body measurements |
| Local funding authority or government forms |
|
| Manufacturer resources |
|
| Seating and Wheeled Mobility: A Clinical Resource Guide (Minkel & Lange) | Comprehensive clinical reference textbook for wheelchair and seating provision |
Setting up the assessment space. A well-prepared environment supports accurate assessment and puts the wheelchair user at ease. Ideally, assessment should take place in a dedicated private room. Where only a shared or open space, such as a gymnasium, is available, privacy screens should be used to maintain the user's dignity and to reduce environmental distractions. Minimising background noise and stimulation helps both the clinician and the wheelchair user concentrate, reducing the risk of important details being missed.[7][8]
The assessment surface is one of the most important considerations. A height-adjustable mat table is ideal, as it allows the clinician to position the user safely for both the supine assessment and supported sitting. It also facilitates accurate measurement-taking. Where a height-adjustable table is not available, a firm massage table or floor mat can be used. It is important to always check weight limits for treatment/massage tables. Whatever surface is used, it must allow the wheelchair user to sit upright with their feet supported. The clinician should also have their own seating available so that they can sit at eye level with the wheelchair user during the interview. As well as being respectful, this allows the clinician to observe posture, breathing, and body language throughout the conversation.[7][8]
Where possible, having trial or demonstration equipment available during the assessment is a significant advantage. Local equipment providers or sales representatives may be able to assist with this.[7][8]
Clinical note: It is not possible to take accurate measurements or design an appropriate seating and mobility system without the wheelchair user transferring out of their current device onto a firm, supported surface. If this cannot be achieved during a visit (e.g., because adequate assistance is not available), it is better to reschedule than to take inaccurate measurements that lead to poorly fitted equipment.[8]
Part One: Assessment Interview
The assessment interview gathers crucial information needed to determine the most appropriate wheelchair for an individual user. It should be understood not as a formal intake procedure but as a collaborative, person-centred conversation. The 2023 WHO Wheelchair Provision Guidelines emphasise that this process must be a partnership between the wheelchair user and trained personnel.[2]
Communication principles. The wheelchair user should always be addressed directly as the primary source of information, rather than their caregiver or family member. Where the user is non-verbal, any communication aids (e.g., speech-generating devices, picture symbols, hearing aids, or glasses) should be present and accessible during the assessment. Even where a family member reports that a non-verbal user cannot see well or cannot communicate meaningfully, the clinician should not take this at face value; the user's own responses during assessment may tell a different story.
From the outset, the clinician should frame the appointment as a collaborative conversation rather than a clinical examination. A relaxed, informal approach helps to ease anxiety and is more likely to elicit accurate and complete information than a formal, structured one.
Open-ended questions should be used throughout. Questions such as "Tell me about a typical day" or "What does your wheelchair need to help you do?" invite richer responses than questions that can be answered with a yes or no. The clinician should also be deliberate about not leading the wheelchair user toward an expected answer; the goal is to understand the user's actual experience, not to confirm assumptions.
Assessment begins before any formal questioning. From the moment the wheelchair user arrives, the clinician should be observing how they navigate their environment: can they access the reception or check-in area? How are they positioned in their current chair? Are there signs of discomfort, compensatory posture, or fatigue? These observations provide important clinical context that may not emerge from questioning alone. Throughout the interview, the clinician should continue to watch the user's body language, noting signs of anxiety, pain, or fatigue. They should also be alert to discrepancies between what a caregiver says and how the wheelchair user responds.
Finally, clinicians should verify referral information rather than assuming it is current or accurate. Changes in the user's function or circumstances may have occurred since the referral was made, and errors in documentation do occur. Validating key clinical information directly with the wheelchair user and their caregiver protects against clinical decisions being made on the basis of outdated or incorrect data.[7][8]
Past, present, and future framework. A useful structure for organising the interview is to think across three timeframes: past, present, and future.
The present forms the foundation of the interview. What is the user's current situation — their daily activities, functional abilities, living environment, and support networks? This is where most of the interview's practical information will come from.
For users who have experienced a change in function through injury, illness, or a progressive condition, the past is also important. Understanding who the person was before (e.g., their occupation, recreational activities, social roles, and prior mobility history) informs goal-setting and supports rapport. It also helps the clinician understand what the wheelchair user may be working toward in their recovery or adaptation. If this is not a first wheelchair, all previous mobility devices should be reviewed, not only seating and positioning equipment. For example, knowing whether the user has previously used a standing frame may be relevant when considering future equipment options.
Looking to the future, the clinician should ask about goals not just for the wheelchair but for the user's life over the next three to five years and beyond. Wheelchair provision should not only address current needs, but also anticipate likely changes in condition, environment, and life circumstance.[7][8]
Key Areas to Cover in the Interview
The interview covers four key areas. The table below outlines the focus of each area, example questions to guide the conversation, and important clinical considerations.[7][8]
| Area | Focus | Example Questions | Clinical Considerations |
|---|---|---|---|
| Wheelchair User Information and Goals |
|
|
The word "goal" may not be familiar to all users; therefore, accessible phrasing helps. Ask users to give a sense of how often they engage in particular activities; frequency has significant implications for equipment specification, and a response that sounds impressive in isolation may reflect exceptional rather than typical use. |
| Physical Condition | Medical diagnoses and specific physical issues that may influence wheelchair selection and postural support requirements. |
|
|
| Lifestyle and Environment | Where and how the wheelchair will be used, including home, community, work or study, transport, and out-of-wheelchair positioning. |
|
|
| Existing Wheelchair | Whether the current wheelchair is meeting the user's needs, and if not, why. |
|
Examine the condition of the wheelchair for clinical clues.
Not all problems require a new wheelchair. Some of these issues may be resolved through adjustment, modification, or repair. |
For more in-depth information, please see: Wheelchair Assessment Interview and Wheelchair Assessment Special Considerations.
Part Two: Physical Assessment
The physical assessment (also referred to as the Mechanical Assessment Tool (MAT) evaluation, biomechanical assessment, or physical evaluation) forms the second part of the wheelchair assessment process. It consists of three elements: identifying the presence, risk, or history of pressure injuries; determining the method of propulsion; and assessing sitting balance. In most cases, it also includes a musculoskeletal examination of range of motion, joint flexibility, muscle length, and skeletal alignment. Neurological factors, such as muscle tone and spasticity patterns, are noted for their effects on posture and muscle length. The postural assessment is conducted in the user's existing wheelchair, in supine, and in supported sitting on a firm surface.[7]
Before beginning the hands-on component, the clinician should explain to the wheelchair user what will happen, including that they will be transferred out of their current device. For users who have been in rehabilitation for some time, their current wheelchair may feel very much their own; preparing the user for this step can reduce anxiety and support cooperation. Throughout the physical assessment, clinicians should observe the wheelchair user's interactions with their environment and with family members or caregivers. Both physical and psychological dynamics should be noted.[7][8]
If you would like to learn more about this topic, please read: Wheelchair Physical Assessment.
Skin Checks and Pressure Injury Risk
Skin inspection should be conducted as a routine component of any wheelchair seating assessment, and is particularly indicated where there is a history of, or risk factors for, pressure injury. Many pressure injuries acquired in sitting develop at seating support surfaces; while the wheelchair cushion and back support are primary sites of concern, all regularly used seating surfaces should be considered, including shower chairs, commodes, car seats, and workplace or school seating.
Before proceeding, explain the purpose of the inspection, obtain consent, and ensure privacy and dignity. Inspection should be conducted in supine or side-lying, as this allows direct visualisation of the areas that bear load in sitting. To better replicate seated tissue loading, simulate the client's sitting posture by flexing the hips and knees in accordance with their wheelchair postural assessment.
The goals of skin inspection are to:
- determine the location and shape of any reported wound or scar tissue
- identify other scars or skin markings that may indicate previous breakdown
- establish whether skin changes are consistent with pressure from a bony prominence against a support surface
If the wheelchair user reports a current pressure injury, ask to see it and conduct a formal wound assessment as part of the seating evaluation.[9]
A wheelchair user is considered at risk of developing a pressure injury if they have three or more of the following risk factors:[7]
- Decreased sensation
- Decreased mobility and/or paralysis
- Moisture from perspiration, water, or incontinence
- Poor posture
- Previous or current pressure injury
- Poor nutrition or inadequate hydration
- Older age
- Being underweight or overweight
Users with absent sensation will always be at risk for pressure injury development.
Propulsion Method
Recording the method of propulsion is important because it affects both wheelchair selection and configuration. The clinician should record whether the user propels using both arms, a single arm (left or right), both legs, a single leg (left or right), or whether they are pushed by a helper or attendant.[7]
Sitting Balance Assessment
The sitting balance assessment determines what additional postural support the user requires. It is completed through three sequential steps: observing unsupported sitting posture, completing a pelvis and hip posture screen, and performing hand simulation.
Not every wheelchair user can sit in an upright posture, even with support. The goal is to find the most upright posture the user can safely, comfortably achieve and maintain without losing function. Assessment will result in one of three findings, as shown in Table 3.[7]
| Finding | Seating Intervention Required |
|---|---|
| A fixed posture is one in which a part of the body cannot be moved with gentle force. | The wheelchair and postural support devices should accommodate this non-neutral position. |
| A flexible to neutral posture is one in which non-neutral parts can be brought to neutral with gentle force. | Appropriate support should be provided to maintain that position. |
| A flexible part-way to neutral posture is one in which non-neutral parts can be moved only part-way toward neutral with gentle force. | Support should be provided to help the user sit as close to neutral as is comfortable and functional. |
Note: The WHO Wheelchair Service Training Package uses the terms fixed, flexible to neutral, and flexible part-way to neutral to describe these three outcomes, and this terminology is used throughout this course. Clinicians should also be aware that current rehabilitation and seating literature increasingly uses the terms reducible and non-reducible to describe postural presentations. A non-reducible posture broadly corresponds to a fixed posture, while a reducible posture encompasses both flexible to neutral and flexible part-way to neutral; that is, any posture that can be moved toward neutral with gentle force, whether fully or partially.
The WHO three-category system makes a clinically important distinction that the reducible/non-reducible binary does not. It separates postures that can be fully corrected from those that can only be partially corrected, which has direct implications for the type of support prescribed. Both sets of terms will be encountered in clinical practice, in the literature, and across the courses in this programme, and they should be understood as complementary rather than contradictory.
Clinical Insight: Observing Unsupported Sitting Posture: The wheelchair user sits on the assessment surface with their feet supported. The clinician observes their posture without providing any support. The purpose is to identify postural tendencies and habits — this is a starting point for understanding what support may be needed. Observing sitting posture is a clinical skill that develops with practice and experience.
Pelvis and Hip Posture Screen
Sitting posture is strongly influenced by what is happening at the pelvis and hips. The pelvis and hip posture screen aims to determine whether the pelvis is level when viewed from the front (anteriorly), and whether the hips can flex to a neutral sitting posture (defined as a trunk-to-thigh angle of 90 degrees or more) with or without support. Where neutral posture is not achievable, the screen also helps to establish whether the restriction originates above the pelvis (in the lumbar spine) or below it (in the hip joint).
The screen is conducted with the wheelchair user in supine on the assessment surface. The clinician works with an assistant, who may be a colleague, trained assistant, family member, or caregiver. Involving family members or caregivers in this process is valuable, as it helps them to understand the postural support solution that will eventually be provided. To conduct the screen, the clinician must be able to locate the bony landmarks of the pelvis, in particular the anterior superior iliac spines (ASIS). They should also understand the influence of muscle groups on joint articulation and distinguish fixed from flexible postural deformities using knowledge of body planes and ranges of movement.[7]
The screen is completed in four steps.
Step 1: The assessor bends both the wheelchair user's knees slightly to relieve hip tension, while the assistant places their hands firmly on the trunk at the lower ribs. The assessor grips the pelvis gently with thumbs on the ASIS and checks whether they are level. If the ASIS are not level, the assessor gently attempts to align the pelvis while the assistant reports any trunk movement, which indicates restriction. The assessor notes how close to level the pelvis can be brought and records findings on the assessment form.[7]
Step 2: The assistant holds the pelvis firmly while the assessor bends the untested leg slightly at the knee and rests the foot on the mat, reducing tension in the hip being tested.[7]
Step 3: The assessor gently moves the tested leg toward a neutral sitting posture; the assistant reports any pelvic movement, which indicates restriction. The assessor assesses how freely the hip moves, repeats on the other side, and compares the two.[7]
Step 4: The assessor uses a goniometer to record how close to neutral posture each hip can reach. The fulcrum is placed at the hip joint, with one arm of the goniometer aligned along the femur and one along the trunk, and right and left hip angle measurements are recorded on the assessment form.[7]
-
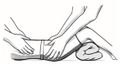 Step 1
 -
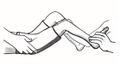 Step 2
 -
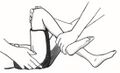 Step 3
 -
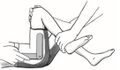 Step 4


Note: Where the pelvis cannot be levelled, or a hip cannot reach a neutral sitting posture, a temporary support made from firm foam should be applied before continuing. This prevents the user from compensating for the pelvic or hip restriction and allows assessment of the remaining postural elements to proceed.
The following video demonstrates how to perform the pelvis and hip posture screen.
Hand Simulation
Hand simulation is where the clinician uses their hands to replicate the support that the wheelchair and postural support devices will eventually provide. This helps identify the postural support required. The wheelchair user sits on a firm, padded, flat surface, ideally one that allows access from all sides. Their feet must be supported at the correct height. Temporary supports should be applied where needed to accommodate an unlevel pelvis or restricted hip flexion.[7]
Clinical Insight: Hand Simulation Principles:
- The clinician should explain to the wheelchair user what they are doing at each step. If the user is non-verbal, an appropriate communication method should be established before beginning so that the user can give feedback.
- Only one change should be made at a time, with the clinician observing how each change affects the rest of the body before proceeding.
- Careful attention should be paid to where the hands are placed, the direction and magnitude of force applied, and the surface area covered.
- Multiple pairs of hands are often necessary, making teamwork essential — involving a family member or caregiver also helps them to understand the eventual postural support solution.
The three steps of hand simulation are as follows.
Step 1: Support is always provided at the pelvis first, as pelvic posture affects all other body segments. The assessor brings the pelvis as close to neutral as is comfortable without using strong force, and observes how this affects the trunk, hips, head, and neck.
Step 2: Once the pelvis is held in position by the assistant, the assessor provides trunk support, levelling the shoulders and bringing the trunk upright over the pelvis. Observing the contour of the pelvis and trunk from the side at this stage is important, as it informs the eventual shape of the backrest.
Step 3: From there, attention moves to the head and neck, then the hips and thighs, and finally the lower legs.
Note: If head control remains difficult despite good pelvic and trunk support, a slight backward recline or additional arm support may help.
Results are recorded on the assessment form, noting whether a neutral sitting posture is achievable for each body segment with hand support, and describing or drawing the final posture achieved and the support provided.[7]
The following video demonstrates this part of the assessment:
Upper Extremity Assessment
For users being considered for manual wheelchair propulsion, the physical assessment should also include upper extremity function. Shoulder range of motion, including extension and internal rotation, supports the push phase of propulsion, and scapular stability affects both efficiency and safety over time. Grip strength and hand function are relevant where push rim use is anticipated, and triceps and pectoral muscle strength are key for independent manual propulsion.[12]
Where a power wheelchair is being considered, fine motor control and head and neck movement should be assessed to determine the most appropriate access method, such as a joystick, head array, or sip-and-puff system.[12]
Functional Mobility Assessment
The physical assessment should also include an observation of the wheelchair user's functional mobility in their current equipment. This includes how the user transfers in and out of the wheelchair and the level of assistance required, as well as whether they can perform pressure reliefs independently and what method they use. The clinician should also observe how long the user can propel or operate their current wheelchair before experiencing fatigue.[12]
Where trial or demonstration equipment is available, a trial during the assessment provides valuable information about likely training needs and helps the user engage meaningfully with the prescription process. Trial equipment may not be a perfect match for the eventual prescription, but it helps to clarify clinical direction and gives the wheelchair user a tangible sense of what is being considered.[8]
Part Three: Body Measurements
Accurate body measurement enables appropriately sized equipment to be trialled and reduces the number of transfers required during fittings. It also allows equipment to be pre-set before appointments and provides an accurate reference for wheelchair configuration during prescription. In addition, it provides the documentation required to support funding applications.[7]
A critical point about measurement accuracy: Measurements must always be taken with the wheelchair user sitting in the most upright, comfortable, and functional posture identified during hand simulation, NOT in supine. Measurements taken lying down will be inaccurate because the body lengthens when supine. If the user cannot sit upright independently, assistance should be obtained to support them in sitting rather than resorting to supine measurement.
Measurement tools. The choice of measurement tools significantly affects the accuracy of the measurements obtained.[8]
- Having two different tape measures is useful: a rigid tape for linear measurements, such as seat depth and width, and a more flexible tape for circumferential measurements, such as head circumference.
- Callipers are particularly useful for width and depth measurements, as they allow a firm, consistent measurement to be taken from both sides simultaneously.
- A goniometer is required for recording hip range of motion during the pelvis and hip posture screen.
- Foot blocks are used to support the wheelchair user's feet at the correct height during seated measurements where the feet do not reach the floor.
- A clipboard or firm board held on each side of the user assists with accurate linear measurements, such as seat width and depth.
- A smartphone or tablet may also be useful for photographic documentation where consent and appropriate data governance are in place.
Basic Measurements
Six measurements are required for wheelchair users with good trunk control who do not require additional postural support.[7] For all measurements, the tape measure must be held straight, the wheelchair user must be sitting upright, and the clinician should bend to view the tape measure at the correct angle rather than reading it from above.

Seat width is measured from the widest aspect of the buttocks, hips, or thighs. The seat should be wide enough to avoid lateral pressure on the hips. Accuracy can be improved by holding two clipboards or firm boards against each side of the user, or by using callipers. Before measuring, check that there is nothing in the user's pockets.
Seat depth is measured from the posterior buttock along the lateral thigh to the popliteal fold, with the palm held horizontal to the seat. A space of approximately 50 mm (2 inches) is typically preserved to avoid pressure from the front edge of the seat on the popliteal fossa — approximately 3–4 fingers should fit between the front edge of the seat and the back of the knee. Both legs should be measured; if a difference exists, the clinician should verify that the pelvis is level before prescribing for the shorter side.
Seat height is determined by the user's height and method of propulsion. For users who propel with their feet, seat height should allow the heel to reach the floor. For users with footrests, a higher seat is appropriate. Seat height is measured from the heel to the popliteal fold with the ankle at 90 degrees if possible. Both legs should be measured. The user should wear the footwear they use most frequently.
Armrest height should allow the user to sit upright with level shoulders when their forearms rest on the armrests. It is measured from the seat surface to the olecranon, with approximately 25 mm (1 inch) added.
Backrest height: the inferior angles of the scapulae should be approximately one finger-breadth above the top of the backrest when the user is sitting upright. Backrest height is measured from the seat surface to the axilla, with approximately 100 mm (4 inches) subtracted. The appropriate height depends on the user's needs — self-propellers require a backrest that allows free movement of the shoulder blades, while users who have difficulty maintaining upright posture may need a higher backrest for greater spinal support.
Footrest length affects how well the feet and thighs are supported, as well as footplate ground clearance. The footplate should be approximately 25–50 mm (1–2 inches) off the ground for adequate clearance. It is measured from the back of the knee to the base of the heel; if the foot is fixed in plantar flexion, the measurement is taken to the toe instead. Both legs should be measured.
Accurate body measurement allows appropriately sized equipment to be trialled, reduces the number of transfers required, and improves time management by allowing equipment to be pre-set before appointments. It also provides an accurate reference for final wheelchair configuration during prescription or future trials, and assists service personnel in outlining clinical reasoning for funding applications. [7]
If you would like to read more, please see: Wheelchair Body Measurements.
Complex Measurements
For wheelchair users who require additional postural support devices, additional measurements are needed. These measurements determine the size and location of postural support devices.[7]

Seat to top of shoulder is used for users requiring a high backrest.
Trunk width, measured just below the axilla, equals the distance between trunk side pads or wedges.
Seat to axilla equals the maximum distance between the top of the cushion and the top of the trunk side pads. Note: trunk side pads must never contact the axilla itself, as this can cause permanent nerve damage, and there must always be at least 30 mm clearance. Note: when taking this measurement, first measure the seat to axilla distance, then subtract 30 mm from the measured distance.
Seat to top of pelvis/PSIS is used to locate the mid-height of a rear pelvis pad.
Distance between knees with the knees placed as close to neutral as is comfortable, equals the width of a knee separator pad.
Seat to base of skull is used to locate the mid-height of a headrest.
Back of pelvis to seat bones plus 20–40 mm equals the distance from the backrest to the beginning of a pre-seat bone shelf.
Clinical Resources
- WHO Wheelchair Service Training Package - Basic level (available in Arabic, Chinese, English, French, Italian, Japanese, Khmer, Portuguese, Romanian, Spanish, Thai, Turkish, Ukrainian, and Vietnamese)
- WHO Wheelchair Service Training Package - Intermediate level (available in Chinese, English, French, Japanese, Korean, Romanian, and Spanish)
- New South Wales State Spinal Cord Injury wheelchair assessment resource
- Prevention and Treatment of Pressure Ulcers/Injuries: Clinical Practice Guideline (National Pressure Injury Advisory Panel)
The following 34 minute videos shows an example of a MAT evaluation and physical assessment.
References
- ↑ Ahmadi A, Jahromi MN, Mostafavi MA, Morales E, Sabo N. Assistive Navigation Technologies for Inclusive Mobility: Identifying Key Environmental Factors Influencing Wheelchair Navigation Through a Scoping Review. ISPRS International Journal of Geo-Information. 2026 Feb 12;15(2):75.
- ↑ 2.0 2.1 World Health Organization. Wheelchair provision guidelines. World Health Organization; 2023 Jun 2.
- ↑ Goldberg M, Rushton P, Kirby RL, Munera S, Kandavel K, Pearlman J, Tawashy A. Wheelchair service provision content in professional rehabilitation organisations’ standards documents and contemporary initiatives: A rapid review. Disability and Rehabilitation: Assistive Technology. 2024 Jan 2;19(1):78-89.
- ↑ Sarsak HI, von Zweck C, Ledgerd R, World Federation of Occupational Therapists. Wheeled and seated mobility devices provision: quantitative findings and SWOT thematic analysis of a global occupational therapist survey. InHealthcare 2023 Apr 10 (Vol. 11, No. 8, p. 1075). MDPI.
- ↑ Papadaki E, Bakaraki MP. Training occupational therapy students in wheelchair service provision: Essential steps for new rehabilitation professionals (Mini-Review). Brazilian Journal of Science. 2025 May 23;4(6):1-0.
- ↑ Fasipe G, Goršič M, Rahman MH, Rammer J. Community mobility and participation assessment of manual wheelchair users: a review of current techniques and challenges. Frontiers in human neuroscience. 2024 Jan 5;17:1331395.
- ↑ 7.00 7.01 7.02 7.03 7.04 7.05 7.06 7.07 7.08 7.09 7.10 7.11 7.12 7.13 7.14 7.15 7.16 7.17 7.18 7.19 7.20 7.21 7.22 World Health Organization. Wheelchair Service Training Package - Basic Level. Available from: https://iris.who.int/server/api/core/bitstreams/e2b3624f-f8bf-4bf6-9fc5-2ba60bf94b4c/content (accessed 5 May 2026).
- ↑ 8.00 8.01 8.02 8.03 8.04 8.05 8.06 8.07 8.08 8.09 8.10 Kiger, A. Foundations of Wheelchair Provision Programme. Comprehensive Evaluation in Wheelchair Provision. Physioplus. 2026.
- ↑ Haesler E. National pressure injury advisory panel, european pressure ulcer advisory panel, pan pacific pressure injury alliance. Prevention Treatment Pressure Ulcers/Injuries. 2025:14-32.
- ↑ YouTube. WSTP Intermediate Video Series: 7. Pelvis and hip posture screen | WHO Wheelchair Training Videos. Available from: https://www.youtube.com/watch?v=ndR0Y6YkXwY [last accessed 5 May 2026]
- ↑ YouTube. WSTP Intermediate Video Series: 10. Hand simulation demonstration | WHO Wheelchair Training Videos. Available from: https://www.youtube.com/watch?v=H7QAMkvPbAw [last accessed 5 May 2026]
- ↑ 12.0 12.1 12.2 Owens J, Davis D. Seating and Wheelchair Evaluation. In: StatPearls [Internet]. Treasure Island (FL): StatPearls Publishing; 2023. Available from: https://www.ncbi.nlm.nih.gov/books/NBK559231/
- ↑ YouTube. Education In Motion: 6 Key Measurements for Prescribing Wheelchairs | Sunrise Medical North America. Available from: https://www.youtube.com/watch?v=4cJV78RD6rM [last accessed 6/6/2009]
- ↑ YouTube. MAT Evaluations Made Easy | Sunrise Medical Australia. Available from: https://www.youtube.com/watch?v=-GfaM_t96QM [last accessed 11 May 2026]