Chest Drains
Top Contributors - Adam Vallely Farrell, Sonal Joshi, Kim Jackson, Evan Thomas, George Prudden and Karen Wilson
Description
[edit | edit source]
What is a Chest Drain?
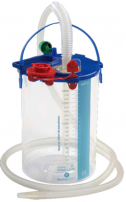
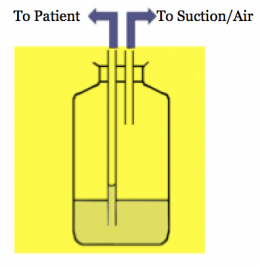
Chest drains provide a method of removing air & fluid substances from the pleural space. The idea is to create a one way mechanism that will let air/fluid out of the pleural space and prevent outside air/fluid from entering into the pleural space. This is accomplished by the use of an underwater seal. The distal end of the drainage tube is submerged in 2cm of H2O. They use flexible plastic tubes which are inserted through the chest wall and into the pleural space between the 5th and 6th intercostal space in the mid-axillary line, venting the space which allows air back out.
Basics of Breathing
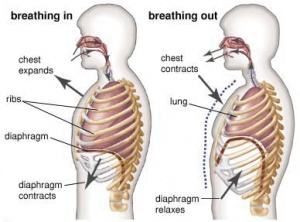
Breathing is stimulated by the build up of CO2 levels in the bloodstream. When the diaphragm descends there is an increase in interthoracic space and a decrease in interthoracic pressure. Intrapulmonary pressure also decreases which draws air into the lungs as the pressure outside of the lungs is greater. Weak diaphragm decreases the available volume making it harder to draw air in and also increases the risk of developing pneumonia. Lungs are surrounded by pleura which have a layer of fluid between them. Visceral pleura is attached to the lungs while the parietal pleura is attached to the ribs. Lungs are elastic and want to recoil with the pleura this elasticity creates the negative pressure which causes the lungs to inflate. Intrapleural pressure is always negative however during inspiration its more negative (-8cm H2O) whilst during expiration when the diaphragm relaxes it’s less negative (-4cm H2O). If this intrapleural pressure is lost eg) during a stabbing the loss of negative pressure will cause the lung to collapse and a chest drain will be needed to restore the correct pressures.
Components & Types of Chest Drain Systems
Components
- Unobstructed chest tube- inserted into pleural cavity/mediastinal cavity to allow air/fluid to leave the chest
- Tubing- 6 foot long flexible tubing which connects the chest tube to the chest drain system
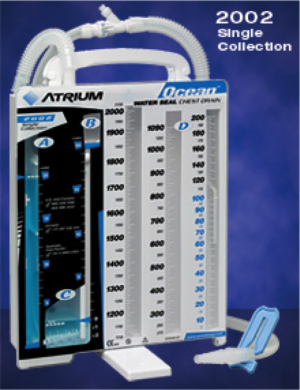
- Water Seal Chamber - Column B – Air released from the pleural space goes into the water seal chamber. Lets the air out of the chest while preventing air from the outside getting back in. Chamber should always have 2cm H2O inside it (>2cm can be too difficult to expire against and <2cm is an ineffective seal meaning air could re-enter the pleural space). Calibrated to reflect intrapleural pressure which should be negative (in a spontaneously breathing adult approx. -8cmH2o on inspiration and -4cmH2O on expiration). Contains a ball which should be oscillating (no oscillation can mean (a) there’s a kink in the system (check patient isn’t lying on any tubes) or (b) the pneumothorax has healed (will show up on CXR)
- Unnamed Chamber - Column C – records the amount of bubbling which is taking place. 1-2 bubbles is normal but >5 can be indicative of a leak somewhere in the system. Leak could be caused by (a) disconnection somewhere in the circuit or (b) a massive tear in the pleura which requires negative pressure in the form of a suction drain. Column A – should have 20cmH20
- One-way mechanism to prevent return of air/fluid (valve).
- Suction control device (optional)//Usually 3-5kPa.
Systems
- Glass Bottle System:
- 1 bottle
- 2 bottle
- 3 bottle
- Plastic System:
- Thoraseal
- Pleuravac
Mechanism of action[edit | edit source]
- Airflow is governed by changes in intra-pleural pressure.
- Negative pressure during inspiration causes water level to rise slightly.
- Positive pressure during expiration pushes air and fluid out of the pleural space and into the tube and collection bottle.
- Air bubbles out of tube into the underwater seal.
- Fluid drains by gravity, mixing with water and raising the fluid level.
Potential Indications for Chest Drain insertion[edit | edit source]
Chest drains are inserted as an invasive procedure to; Remove fluid/air from the pleural space/mediastinum, and/or Re-expand the lungs and restore negative intrapleural pressure and respiratory function.
Conditions that require a chest drain include;
- Pneumothorax - "Air in the pleural cavity". This occurs when there is a breach of the lung surface or chest wall which allows air to enter the pleural cavity and consequently cause the lung to collapse.
- Pleural Effusion - collection of fluid abnormally present in the pleural space, usually resulting from excess fluid production and/or decreased lymphatic absorption.
- Haemothorax - the presence of blood in the pleural space. The source of blood may be the chest wall, lung parenchyma, heart, or great vessels.
- Chylothroax- is a type of pleural effusion. It results from lymph formed in the digestive system called chyle accumulating in the pleural cavity due to either disruption or obstruction of the thoracic duct.
- Empyema- is a collection or gathering of pus within a naturally existing anatomical cavity. For example, pleural empyema is empyema of the pleural cavity. It must be differentiated from an abscess, which is a collection of pus in a newly formed cavity.
- Post Cardiac or thoracic surgery
Complications of Chest Drains[edit | edit source]
- Pain – chest wall/ neck / shoulder
- Failure to enter the pleural space
- Infection at insertion site or intrapleurally
- Penetration / lacerations to lungs
- Penetration of peritoneal space - laceration of the diaphragm
- Haemorrhage
- Blocked drains
- Pleural sepsis
- Subcutaneous emphysema
Insertion of a Chest Drain[edit | edit source]
Local anaesthetic and intravenous analgesia are mandatory, as the placement is a painful procedure. The use of sedation should always be discussed with a senior emergency doctor, as it can potentially worsen the patient's clinical condition.
Establish patient on continuous cardiac monitoring and pulse oximetry
Procedure as per 'The Royal Hospital Melbourne" Guidelines for 'Chest drain (intercostal catheter) insertion'
- Place conscious patient in a sitting position at 45 degrees with arm of same side placed above head
- Palpate the fourth or fifth intercostal space just anterior to the mid-axillary line
- Surgically prepare the area
- Ensure local anaesthetic is infiltrated from subcutaneous tissue down to pleura.
- Select the appropriate size I.C.C. and remove stylet.
- Incise the skin parallel to the upper border of the rib below the chosen intercostal space. Incise down to the fascia.
- "Blunt dissect" (using an artery forcep) down to the pleura, enter the pleural space, and then widen the hole by opening the forceps.
- Sweep the pleural space with a gloved finger to widen the hole and push the lung away from the hole (only possible in older children, beware of rib fractures in injured child).
- Hold the tip of the catheter with a curved artery clamp and advance it into the pleural space, directing the catheter posteriorly and superiorly.
- Advance so that all apertures of the tube are in the chest and not visible.
- Attach the tube to UWSD below the patient's chest level.
- Anchor the drain and suture the wound. Tape in place with tegaderm sandwich and anchor the tube to the patient's side. - Connect to the UWSD.
- Watch for "swinging" of water in tube connection.
Assessment of a Chest Drain[edit | edit source]
- Location:
- Anterior
- Basal
- Right or Left side etc
- Pain
- Swing/Oscillation - Normal – reflects the changes in pleural pressure on breathing (if not on suction). Will gradually lessen and stop as lung re-expands. If drain is not swinging; Gradual : lung re-expanded, Sudden : ?obstructed or ?lung collapse, Check for suction : Wall suction – no swing
- Draining- Denotes volume of fluid draining from pleural space. Dependent on pathology; Post op – mostly occurs in first few hours, Fluid – slow drainage, Pneumothorax – minimal. If amount in bottle is excessive, its more difficult for air to be expelled. If there is a lack of drainage – check for kinks or obstruction
- Bubbling- Reflects the amount of air draining out of the pleural space. Usually occurs during expiration or coughing. May also occur on inspiration if big air leak present. Large volume air leaks may require suction to remove air; if persistent may require pleurodesis. Continuous bubbling – means there is a connection between the lung and intra pleural space. If bubbling stops check for; Kink, Blockage, Disconnection.
- Suction- Application of a negative pressure (3-5kPa) to restore negative pressure in the pleural space. Typically used if there is a large volume of air or fluid to be removed from the pleural space
- CXR
- Auscultation
Always ensure you know the location of chest drain clamps in case you need them in an emergency!!
Handling of Chest Drain[edit | edit source]
- Familiarise yourself with the location of the clamps in case of emergency
- Drains should be on the floor on their stand for gravity drainage
- Keep bottles/drains below the level of the patient’s chest – if you need to move the patient from lying to sitting this should be done on the side the chest drain is on
- Clamping should be avoided if at all possible – clamping can cause a tension pneumothorax which leads to compression of the heart and a mediastinal shift which can be fatal.
- Don’t pass the chest drain over the patient – loss of gravity could cause contents to spill back into the pleural space.
- If you knock over the chest drain: put it back upright, check the levels and inform the nurse on duty so she can perform the necessary tests to make sure it’s still working properly.
- Need to carefully plan any movements to avoid disconnection from the drain during activity
- If theres a suction port attached to the chest drain and you need to mobilise the patient you have to get surgical permission to temporarily disconnect the suction
Clamping[edit | edit source]
It is never appropriate to clamp chest drains for mobilisation / transport of patients. NEVER clamp in tension pneumothorax or if still bubbling.
When would you clamp a drain?
- Post pneumonectomy
- Changing bottle
- Break in circuit
Accidental Disconnection of Tube[edit | edit source]
- Part of the system becomes disconnected or drain/bottle breaks;
- Clamp the tubing close to the patients chest
- Reconnect with sterile tubing or new drain
- Unclamp and restore drainage
- Report the incident
- Tubing becomes disconnected from the patient
- Ask patient to exhale and press gauze against the wound at end exhalation
- Ask patient to breathe normally
- Call for medical help but stay with patient and maintain pressure on the wound
- Observe the breathing rate and chest symmetry
- Reassure the patient and give them oxygen if they become distressed
Physiotherapy Treatment Options[edit | edit source]
Techniques to remove air from pleural space;
1. Mobilisation
2. Deep breathing exercises: N.B FET & Supported Cough
-Positive pressure NIV techniques are CONTRAINDICATED!
Mobilisation :
- Patients can be mobilised with a chest drain.
- If they are on suction, check if it is a portable suction machine, if so, you will require a trolley to mobilise patient safely.
- If suction is attached to the wall & cannot be disconnected//consider bedside exercises.
- Always bring clamp in case of accidental break in circuit.
- Always call a nurse if you think there is a problem.
-Before and after treatment it is important to check the drain for any changes – if changes occur you need to document them and report them to the relevant member of the MDT eg) excessive drainage or no pressure swing during inspiration and expiration in the water seal level.
-Look at patients vitals, response to treatment, postioning, etc
Do's and Don't
- Look for- oscillation, bubbling and draining.
- Avoid clamping the drain.
- Always keep below the level of the patient.
- Keep chambers upright.
- Always call a nurse if you think there is a problem.
- Patients can be mobilised with a chest drain- may require a trolley if suction present or multiply drains & other attachments (e.g. portable O2).
Key Evidence[edit | edit source]
add text here relating to key evidence with regards to any of the above headings
Resources[edit | edit source]
add appropriate resources here, including text links or content demonstrating the intervention or technique
Case Studies[edit | edit source]
add links to case studies here (case studies should be added on new pages using the case study template)
Recent Related Research (from Pubmed)[edit | edit source]
Extension:RSS -- Error: Not a valid URL: Feed goes here!!|charset=UTF-8|short|max=10
References[edit | edit source]
References will automatically be added here, see adding references tutorial.
