Adding images: Difference between revisions
mNo edit summary |
Kim Jackson (talk | contribs) No edit summary |
||
| (37 intermediate revisions by 3 users not shown) | |||
| Line 1: | Line 1: | ||
== First a word about copyright == | |||
{{#ev:youtube|MW0ZugnujzQ}} | |||
== Check Copyright Status of an Image == | |||
You may find yourself in a situation where the copyright status of an image is not available on the file page. In this case, you can either replace the image with one that you know is free to use or you can do a reverse image search using a wonderful tool available on Google, the reverse image search. You can access this tool [https://images.google.com/ here]. It is simple to use, select your image, click on the camera icon and either: type in the URL of the image, upload from your computer or drag into the box. Voila! | |||
== Uploading images to Physiopedia == | == Uploading images to Physiopedia == | ||
#First | #First, save the image you intend to use to your computer. | ||
# | #Next, upload it to Physiopedia. Click on the '''Tools''' link in the top right of the navigation bar, from the drop-down menu select '''Upload File'''. | ||
# | #A file upload page will open. Click on the '''Choose File''' link and select the image file from your computer. | ||
#This will automatically fill in the | #This will automatically fill in the destination filename (the name that the image will be given in Physiopedia) but you should change this for something more appropriate and identifiable e.g. hip fracture or gluteus maximus. | ||
#Then in the summary box '''add the source and/or reference for the image'''. | #Then in the summary box '''add the source and/or reference for the image'''. | ||
#Under the licensing drop down menu select the most appropriate licence for the image. | #Under the licensing drop-down menu select the most appropriate licence for the image. | ||
#Then click the '''Upload File''' button. | #Then click the '''Upload File''' button. | ||
Once the image has uploaded you will be directed to the page ("File") that has been created to house that image in Physiopedia. Now you are ready to put the image on to your Physiopedia page. | |||
{{#ev:youtube|Q89h7a9HHfQ}} | |||
== Inserting images on pages == | == Inserting images on pages == | ||
#Go to the Physiopedia page that you are editing and place your cursor in the text where you want the image to appear. From the editing toolbar click on '''Insert''' and then from the drop down menu click '''Media'''. | #Go to the Physiopedia page that you are editing and place your cursor in the text where you want the image to appear. From the editing toolbar click on '''Insert''' and then from the drop-down menu click '''Media'''. | ||
#A pop up box will appear, you can either '''Search''' for an image that has already been uploaded to the media library or you can '''Upload''' a new image. | #A pop-up box will appear, you can either '''Search''' for an image that has already been uploaded to the media library or you can '''Upload''' a new image. | ||
#Once you have found or uploaded the image you wish to use click the blue Save button. | #Once you have found or uploaded the image you wish to use click the blue '''Save''' button. | ||
#A new pop up box will appear that allows you to format the image. If you wish you can add a caption, border, position and size to your image. | #A new pop up box will appear that allows you to format the image. If you wish you can add a caption, border, position and size to your image. | ||
#'''Click OK'''. | #'''Click OK'''. | ||
#Then '''Save the page''' that you are editing. | #Then '''Save the page''' that you are editing. | ||
Your image should now be on the page. | Your image should now be on the page. | ||
{{#ev:youtube|p2_3K_PTKsM}} | |||
== Editing Images == | |||
To make edits to an image in Physiopedia all you need to do is: | |||
# In editing mode, click on the image and click on the '''Edit''' link that appears | |||
# A pop-up box will appear where you can make edits to and change the formatting for the image. | |||
# To change the size or position of your image choose the Advanced option | |||
# When you are done click '''Save'''! | |||
{{#ev:youtube|ms-yuehekiQ}} | |||
== Replacing Images == | |||
If you need to replace an image, either because of a copyright violation or you find a more suitable one, the process is simple: | |||
# Go to the image file page, by clicking on the image | |||
# Click '''Upload a new version of this file''' | |||
# Click on the '''Choose File''' link and select the image file from your computer. | |||
#This will automatically fill in the destination filename (the name that the image will '''<nowiki>[[Image:imagename.jpg]]</nowiki>'''be given in Physiopedia) but you should change this for something more appropriate and identifiable | |||
== Cropping Images == | |||
If you need to crop an image, crop it before uploading it as it cannot be cropped once uploaded. | |||
== Adding Alternative Text == | |||
When you're adding or reviewing an image to a Physiopedia page, remember it's important to be inclusive for people with visual impairments. For people with limited vision a screen reader may be used when interacting with digital content. To this follow the steps below: | |||
# Upload your image, or click on an existing image, then click the '''Edit''' button | |||
# You will see a header '''Alternative Text.''' In the text box below this, add a detailed but concise description of the image. The description should explain the key elements and relevance of the image in relation to the content. | |||
# Remember to Apply the changes that you made.[[File:Alternative Text.png|alt=This image shows how to add a verbal description to an uploaded image|frameless|center]] | |||
[[Image: | == Adding/Editing Images in Source Code (Wikitext) == | ||
In the source code (which you can see by clicking on '''Edit Source''' in the Edit drop-down menu) the code for the image will look something like this: '''<nowiki>[[Image:imagename.jpg]]</nowiki>''' you can change the size and location by adding information to the wiki code: | |||
*Frameless image - '''<nowiki>[[Image:imagename.jpg]]</nowiki>''' | |||
*Thumbnail - "'<nowiki>[[Image:imagename.jpg]|thumb]</nowiki> | |||
*Change the size '''<nowiki>[[Image:imagename.jpg|150x150px]]</nowiki>''' | |||
*Change the position on the page '''<nowiki>[[Image:imagename.jpg|center]]</nowiki>'''[[Image:Shoulderjtarticulations.jpg|80x80px|right]] | |||
*To position a small image to the right of the text '''<nowiki>[[Image:Shoulderjtarticulations.jpg|80x80px|right]]</nowiki>''' would look like this | |||
*To position a larger image in the center of the page '''<nowiki>[[Image:Shoulderjtarticulations.jpg|100x100px|center]]</nowiki>''' would look like this [[Image:Shoulderjtarticulations.jpg|center]] | |||
<br> | For more help on uploading and styling your images see the [http://meta.wikimedia.org/wiki/Help:Images_and_other_uploaded_files mediawiki help page on uploading images].<br> | ||
== Adding Side by Side Images == | |||
There may be instances when you want to add two or images side to side on your page, to do this you will need to edit the source code (see above). It is really important that if you want to display side by side images that you use columns and not tables, this will ensure that the images display correctly on different devices. There are two ways to do this and which one you choose will depend on how you want your images to be displayed, method one is using the Gallery code and method two is using the code for columns. Why not look at the following examples and then changing the size of your screen and watching what happens! | |||
=== Displaying Images using the Gallery Code === | |||
This is the easiest and most simplest way to display side by images and is great for displaying images that all of equal size (or that can be displayed within a frame). You will notice in the example below that the images are different sizes but a grey box has been added to the smaller images:<br> | |||
<pre><gallery widths="250px" heights="350px"> | |||
File: Amelia right forearm2.jpg|Amelia right forearm | |||
File: Phocomelia.jpg|Example of a person with Phocomelia | |||
File: Pffd.png|Proximal focal femoral deficiency </gallery></pre> | |||
<gallery widths="250px" heights="350px"> | |||
File: Amelia right forearm2.jpg|Amelia right forearm | |||
File: Phocomelia.jpg|Example of a person with Phocomelia | |||
File: Pffd.png|Proximal focal femoral deficiency </gallery> | |||
===Displaying Mutliple Images Using Columns=== | |||
You can also use columns to display your images, this is particularly useful if you want to display images that are not equal in space or distance, but of course you can have them all the same size and equally spaced too. For example if you have been awarded multiple badges you can '''add them side by side'''. To do this you will need to use columns, like this: | |||
<pre><div class="row"> | |||
<div class="col-md-2"> [[Image:Yellow-belt.png|200px]]</div> | |||
<div class="col-md-2"> [[Image:Yellow-belt.png|100px]]</div> | |||
<div class="col-md-2"> [[Image:Yellow-belt.png|200px]]</div> | |||
<div class="col-md-2"> [[Image:Yellow-belt.png|100px]]</div> | |||
</div></pre> | |||
Which would look like this: | |||
<div class="row"> | |||
<div class="col-md-2"> [[Image:Yellow-belt.png|200px]] </div> | |||
<div class="col-md-2"> [[Image:Yellow-belt.png|100px]] </div> | |||
<div class="col-md-2"> [[Image:Yellow-belt.png|200px]] </div> | |||
<div class="col-md-2"> [[Image:Yellow-belt.png|100px]] </div> | |||
</div> | |||
or | |||
<pre><div class="row"> | |||
<div class="col-md-2"> [[Image:Yellow-belt.png|100px]]</div> | |||
<div class="col-md-4"> [[Image:Yellow-belt.png|100px]]</div> | |||
<div class="col-md-2"> [[Image:Yellow-belt.png|100px]]</div> | |||
<div class="col-md-4"> [[Image:Yellow-belt.png|100px]]</div> | |||
</div></pre> | |||
Which would look like this: | |||
<div class="row"> | |||
<div class="col-md-2"> [[Image:Yellow-belt.png|100px]] </div> | |||
<div class="col-md-4"> [[Image:Yellow-belt.png|100px]] </div> | |||
<div class="col-md-2"> [[Image:Yellow-belt.png|100px]] </div> | |||
<div class="col-md-4"> [[Image:Yellow-belt.png|100px]] </div> | |||
</div> | |||
< | == Adding or Changing Licence Information == | ||
If you find an image that does not include details of licence type this can be added by following the instructions below: | |||
# Click on the '''Edit''' menu and choose '''Edit Source''' | |||
# If there are no details you can paste this code '''<nowiki>{{subst:Template:Image Detail}}</nowiki>''' | |||
# Click '''Save the Page!''' You will now be able to add a Summary to your image as well as licencing information | |||
# Again Click on the '''Edit''' menu and choose '''Edit Source''' | |||
# Add your summary information | |||
# Choose a template from [[Templates#Image Licenses|Licence Templates]] | |||
# Click on the appropriate licence description, you can then '''copy''' and '''paste''' the template name into the document '''<nowiki>{{Template:XXXX}}</nowiki>''' | |||
# '''Save''' your page! | |||
== Using Physiopedia Images in Social Media == | |||
* Images under the Creative commons-license may be used to create images for social media posts (Physiopedia and Plus). | |||
* Images that were specifically allowed for use on Physiopedia pages cannot be used for social media posts, unless permission is requested from the owner of the image! | |||
== Some Useful Tips on Finding Images == | |||
A few helpful links for copyright-free images. For those using a Safari browser, it is possible to change your search settings to reflect "non-copyright images". That way, your search results will only include images that are free and non-copyrighted. For those using Windows and Google Chrome, you can also set your search for copyright-free images. You simply perform a regular search, click the "Tool" button, choose "Usage" and then you can select to only receive images that are free to use. | |||
A few helpful links for non-copyright images: | |||
* [https://ageingbetter.resourcespace.com/pages/home.php Age-positive image library] - from Ageing Better. It has a wide selection of photographs that avoid negative stereotypes associated with older people | |||
* [https://ccsearch.creativecommons.org/ CC Creative Commons] | |||
* [https://www.flickr.com Flickr] | |||
* [https://www.freepik.com/ Freepik] | |||
* [https://www.injurymap.com/free-human-anatomy-illustrations Injury Map - Anatomical Injuries] | |||
* [https://www.piqsels.com/ Piqsels] | |||
* [https://pixabay.com Pixabay] | |||
* [[Partner Images|Primal Pictures]] - Anatomy images | |||
* [https://www.pxfuel.com/ Pxfuel] | |||
* [https://pxhere.com/ PxHere] | |||
* [https://publicdomainvectors.org/ Publicdomainvectors.org] - copyright-free vector images | |||
* [http://radiopaedia.org/ Radiopedia] - Radiography images | |||
* [https://www.shutterstock.com Shutterstock] (check before uploading - may be copyright restrictions) | |||
* [https://www.skillscommons.org/handle/taaccct/13997 Skills Commons] - Some great free orthotic and prosthetic images | |||
* [https://smart.servier.com/ Smart Servier Medical Art] | |||
* [https://www.sportengland.org/press-pack/log-in Sports Images from Sport England] (Requires log in) | |||
* [https://stocksnap.io Stocksnap] | |||
* [https://unsplash.com/ Unsplash] | |||
* [https://www.wikimedia.org Wikimedia] | |||
[[Category:Help]] | |||
[[Category:User Tutorials]] | |||
Latest revision as of 11:20, 22 May 2023
First a word about copyright[edit | edit source]
Check Copyright Status of an Image[edit | edit source]
You may find yourself in a situation where the copyright status of an image is not available on the file page. In this case, you can either replace the image with one that you know is free to use or you can do a reverse image search using a wonderful tool available on Google, the reverse image search. You can access this tool here. It is simple to use, select your image, click on the camera icon and either: type in the URL of the image, upload from your computer or drag into the box. Voila!
Uploading images to Physiopedia[edit | edit source]
- First, save the image you intend to use to your computer.
- Next, upload it to Physiopedia. Click on the Tools link in the top right of the navigation bar, from the drop-down menu select Upload File.
- A file upload page will open. Click on the Choose File link and select the image file from your computer.
- This will automatically fill in the destination filename (the name that the image will be given in Physiopedia) but you should change this for something more appropriate and identifiable e.g. hip fracture or gluteus maximus.
- Then in the summary box add the source and/or reference for the image.
- Under the licensing drop-down menu select the most appropriate licence for the image.
- Then click the Upload File button.
Once the image has uploaded you will be directed to the page ("File") that has been created to house that image in Physiopedia. Now you are ready to put the image on to your Physiopedia page.
Inserting images on pages[edit | edit source]
- Go to the Physiopedia page that you are editing and place your cursor in the text where you want the image to appear. From the editing toolbar click on Insert and then from the drop-down menu click Media.
- A pop-up box will appear, you can either Search for an image that has already been uploaded to the media library or you can Upload a new image.
- Once you have found or uploaded the image you wish to use click the blue Save button.
- A new pop up box will appear that allows you to format the image. If you wish you can add a caption, border, position and size to your image.
- Click OK.
- Then Save the page that you are editing.
Your image should now be on the page.
Editing Images[edit | edit source]
To make edits to an image in Physiopedia all you need to do is:
- In editing mode, click on the image and click on the Edit link that appears
- A pop-up box will appear where you can make edits to and change the formatting for the image.
- To change the size or position of your image choose the Advanced option
- When you are done click Save!
Replacing Images[edit | edit source]
If you need to replace an image, either because of a copyright violation or you find a more suitable one, the process is simple:
- Go to the image file page, by clicking on the image
- Click Upload a new version of this file
- Click on the Choose File link and select the image file from your computer.
- This will automatically fill in the destination filename (the name that the image will [[Image:imagename.jpg]]be given in Physiopedia) but you should change this for something more appropriate and identifiable
Cropping Images[edit | edit source]
If you need to crop an image, crop it before uploading it as it cannot be cropped once uploaded.
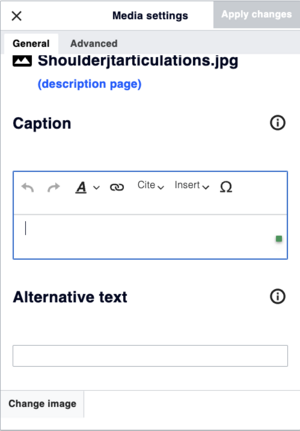
Adding Alternative Text[edit | edit source]
When you're adding or reviewing an image to a Physiopedia page, remember it's important to be inclusive for people with visual impairments. For people with limited vision a screen reader may be used when interacting with digital content. To this follow the steps below:
- Upload your image, or click on an existing image, then click the Edit button
- You will see a header Alternative Text. In the text box below this, add a detailed but concise description of the image. The description should explain the key elements and relevance of the image in relation to the content.
- Remember to Apply the changes that you made.

Adding/Editing Images in Source Code (Wikitext)[edit | edit source]
In the source code (which you can see by clicking on Edit Source in the Edit drop-down menu) the code for the image will look something like this: [[Image:imagename.jpg]] you can change the size and location by adding information to the wiki code:
- Frameless image - [[Image:imagename.jpg]]
- Thumbnail - "'[[Image:imagename.jpg]|thumb]
- Change the size [[Image:imagename.jpg|150x150px]]
- Change the position on the page [[Image:imagename.jpg|center]]

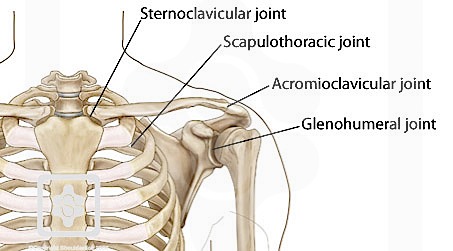
- To position a small image to the right of the text [[Image:Shoulderjtarticulations.jpg|80x80px|right]] would look like this
- To position a larger image in the center of the page [[Image:Shoulderjtarticulations.jpg|100x100px|center]] would look like this

For more help on uploading and styling your images see the mediawiki help page on uploading images.
Adding Side by Side Images[edit | edit source]
There may be instances when you want to add two or images side to side on your page, to do this you will need to edit the source code (see above). It is really important that if you want to display side by side images that you use columns and not tables, this will ensure that the images display correctly on different devices. There are two ways to do this and which one you choose will depend on how you want your images to be displayed, method one is using the Gallery code and method two is using the code for columns. Why not look at the following examples and then changing the size of your screen and watching what happens!
Displaying Images using the Gallery Code[edit | edit source]
This is the easiest and most simplest way to display side by images and is great for displaying images that all of equal size (or that can be displayed within a frame). You will notice in the example below that the images are different sizes but a grey box has been added to the smaller images:
<gallery widths="250px" heights="350px">
File: Amelia right forearm2.jpg|Amelia right forearm
File: Phocomelia.jpg|Example of a person with Phocomelia
File: Pffd.png|Proximal focal femoral deficiency   </gallery>
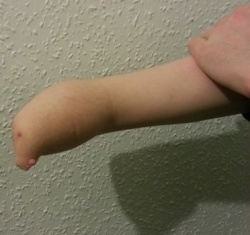
Amelia right forearm
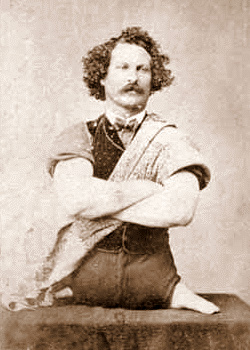
Example of a person with Phocomelia
Proximal focal femoral deficiency


Displaying Mutliple Images Using Columns[edit | edit source]
You can also use columns to display your images, this is particularly useful if you want to display images that are not equal in space or distance, but of course you can have them all the same size and equally spaced too. For example if you have been awarded multiple badges you can add them side by side. To do this you will need to use columns, like this:
<div class="row">
 <div class="col-md-2"> [[Image:Yellow-belt.png|200px]]</div>
  <div class="col-md-2"> [[Image:Yellow-belt.png|100px]]</div>
  <div class="col-md-2"> [[Image:Yellow-belt.png|200px]]</div>
  <div class="col-md-2"> [[Image:Yellow-belt.png|100px]]</div>
</div>
Which would look like this:

or
<div class="row">
 <div class="col-md-2"> [[Image:Yellow-belt.png|100px]]</div>
  <div class="col-md-4"> [[Image:Yellow-belt.png|100px]]</div>
  <div class="col-md-2"> [[Image:Yellow-belt.png|100px]]</div>
  <div class="col-md-4"> [[Image:Yellow-belt.png|100px]]</div>
</div>
Which would look like this:
Adding or Changing Licence Information[edit | edit source]
If you find an image that does not include details of licence type this can be added by following the instructions below:
- Click on the Edit menu and choose Edit Source
- If there are no details you can paste this code {{subst:Template:Image Detail}}
- Click Save the Page! You will now be able to add a Summary to your image as well as licencing information
- Again Click on the Edit menu and choose Edit Source
- Add your summary information
- Choose a template from Licence Templates
- Click on the appropriate licence description, you can then copy and paste the template name into the document {{Template:XXXX}}
- Save your page!
Using Physiopedia Images in Social Media[edit | edit source]
- Images under the Creative commons-license may be used to create images for social media posts (Physiopedia and Plus).
- Images that were specifically allowed for use on Physiopedia pages cannot be used for social media posts, unless permission is requested from the owner of the image!
Some Useful Tips on Finding Images[edit | edit source]
A few helpful links for copyright-free images. For those using a Safari browser, it is possible to change your search settings to reflect "non-copyright images". That way, your search results will only include images that are free and non-copyrighted. For those using Windows and Google Chrome, you can also set your search for copyright-free images. You simply perform a regular search, click the "Tool" button, choose "Usage" and then you can select to only receive images that are free to use.
A few helpful links for non-copyright images:
- Age-positive image library - from Ageing Better. It has a wide selection of photographs that avoid negative stereotypes associated with older people
- CC Creative Commons
- Flickr
- Freepik
- Injury Map - Anatomical Injuries
- Piqsels
- Pixabay
- Primal Pictures - Anatomy images
- Pxfuel
- PxHere
- Publicdomainvectors.org - copyright-free vector images
- Radiopedia - Radiography images
- Shutterstock (check before uploading - may be copyright restrictions)
- Skills Commons - Some great free orthotic and prosthetic images
- Smart Servier Medical Art
- Sports Images from Sport England (Requires log in)
- Stocksnap
- Unsplash
- Wikimedia

