Wound Care Basics: Objective Assessment: Difference between revisions
No edit summary |
No edit summary |
||
| Line 11: | Line 11: | ||
The following short video discusses principles of draping to provide patient privacy and comfort. | The following short video discusses principles of draping to provide patient privacy and comfort. | ||
{{#ev:youtube|Q6oCdxISRCE | {{#ev:youtube|Q6oCdxISRCE|500}}<ref>YouTube. Principles of Draping Patients for Physical Exams. Available from: https://www.youtube.com/watch?v=Q6oCdxISRCE&t=85s [last accessed 13 Feb 2023]</ref> | ||
=== Old Wound Covering and Dressing Removal === | === Old Wound Covering and Dressing Removal === | ||
Revision as of 19:29, 13 February 2023
Top Contributors - Stacy Schiurring and Jess Bell
Introduction[edit | edit source]
Objective Assessment[edit | edit source]
Prepare the Patient[edit | edit source]
The objective assessment of the wound may take some time therefore it is important to consider the patient's position and comfort during the assessment. Ideal positioning will provide the patient both comfort and modesty while allowing the clinician full access to the treatment area.
The following short video discusses principles of draping to provide patient privacy and comfort.
Old Wound Covering and Dressing Removal[edit | edit source]
When ready to begin your objective assessment of the wound, first note the appearance of the old dressing:
- is it intact or missing?
- note any drainage on inside and outside of dressing (strike through drainage)
- Is there areas of wear on the dressing?
Wound Description[edit | edit source]
Remove the old dressing and thoroughly clean the wound with normal saline or with sterile water. The following is a guide to useful wound descriptors. Remember to describe the wound in a way that another healthcare provider will be unable to understand your documentation and followup your treatment plan.
- Wound Location:
- Always use an anatomical landmark as reference when describing location
- Be specific and use anatomical terms
- Document right/left, medial/lateral, distal/proximal, and cranial/caudal
- For larger areas, you can narrow it down by region such as the distal one-third of the medial lower leg, five centimetres proximal to the medial malleolus, or 10 centimetres distal to the lateral knee joint.
- Wound Shape:
- Shape can give an indication of aetiology and helps document wound changes over time
- Possible descriptors include circular, round, oval, irregular, square, linear, punched out, or butterfly
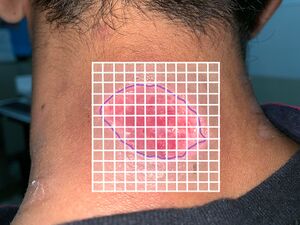
- Wound Measurement:
- Wound dimensions are a significant outcome measure and are important to monitor response to treatment plan, as well as the prognosis for the wound.
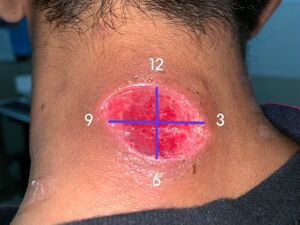
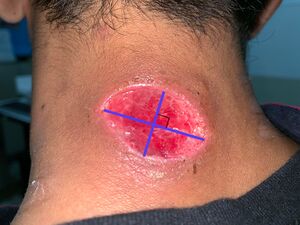
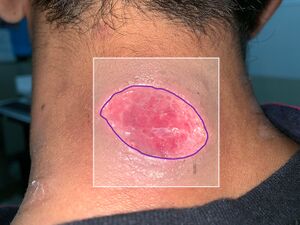
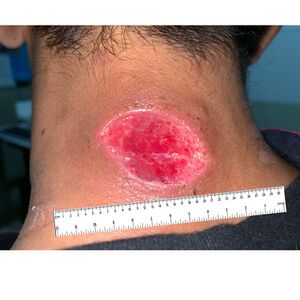
- Measurements should be taken in centimetres or millimetres from wound edge to wound edge, and should include (1) length, (2) width, (3) surface area, and (4) depth. Volume may also be calculated, but isn't as common unless it's a very large wound.
- Wound measurements are typically recorded once per week, but can be taken more frequently to capture rapid changes in fast healing or deteriorating wounds.
- Large stagnant or chronic wounds may only need to be measured every other week or monthly
- New measurements should be taken following a change in patient status or following a surgical intervention of the wound.
| Method of Wound Measurement | Description | Advantage of Method | Disadvantage of Method | Examples |
|---|---|---|---|---|
| Clock Method |
|
|
The greatest length and greatest width is not necessarily at 12 o'clock to six o'clock and three o'clock to nine o'clock, therefore it may not capture the true size of the wound. | |
| Perpendicular Method |
|
|
||
| Tracing Method |
|
|
|
|
| Photography |
|
|
Facilities may not have the equipment or the capabilities for digital photography | |
| Planimetry |
|
Computer planimetry is the standard method used in wound research, but is rarely used clinically due to cost and availability. |
- Wound edges: So wound edges are relevant because this indicates healing potential, prognosis, and also indication for further interventions that might be needed. Even or punched-out edges are usually the result of tissue hypoxia due to peripheral arterial disease, poor cardiac output, or anaemia. Uneven or serpentine edges are typically seen in venous insufficiency and are usually accompanied by oedema and periwound haemosiderin staining. Sloped edges are desirable since sloped edges are good for epithelial cells to migrate across the wound bed. And with sloped edges, it's difficult to determine sort of where the open wound ends and where the new epithelialisation begins because it's very, they kind of join together. Epibole or rolled edges occur when cells are unable to migrate across the wound bed. This may be due to a wound bed that's unhealthy due to lack of perfusion or nutrition, the presence of bacterial biofilm, infection, hypergranulation, or sometimes just repeated trauma. Detached edges are seen when the epithelium is detached from the subcutaneous tissue. So undermining is shelf-like. A sinus tract has an entrance, but no exit, so it's mine-like. And then a tunnel has an entrance and an exit, just like a tunnel would. Detached edges should be documented based on their location, using the clock as a reference. Measure the depth with a slightly saline-moistened cotton tip applicator.
- Tissue type within the wound bed: You also want to document the tissue types that you see in the wound bed. Tissue can be described as either viable or non-viable. Viable tissue is bright, shiny, bouncy, taut, and moist. Viable tissue can be either granulation tissue or epithelial tissue. Granulation tissue is new growth of small blood vessels and connective tissue. It is soft and spongy, and it may bleed if it's touched. It's usually pale pink initially, and then becomes like a beefy red as it becomes more vascular. Healthy granulation tissue is bright red, shiny, granular, or bumpy with a velvety appearance. Unhealthy granulation tissue is pale or dull red due to poor vascular supply. It may also be friable and disintegrate with dressing removal or with cleansing. Hypergranulation is an overgrowth of granulation tissue that rises above the wound surface. It's irregularly shaped, has large or swollen granules. Hypergranulation is typically due to maceration, critical colonisation, infection, or friction on the wound bed, and it must be removed for healing to occur. Epithelial tissue is pink or red in colour and has the appearance of new skin. Slough is non-viable subcutaneous tissue and by-products. It's usually yellow to tan in colour and can be mucousy or stringy. It's a result of the body breaking down dead cells and ranges from non-adherent to loosely adherent to tissue. Keep in mind that not all yellow tissue is slough. Yellow tissue can also be fat, reticular membrane of the dermis, or a tendon. It's important to distinguish between these tissue types for both your assessment as well as debridement purposes. Eschar indicates some deeper tissue damage. It's usually black, grey, or brown. It's adherent and may be hard, spongy, rubbery, or leathery. Eschar is sometimes confused with scabs. A scab is a collection of dried blood cells, platelets, and serum on top of the skin surface, and the healing actually occurs beneath the scab, whereas eschar is dead tissue that must be removed.
- Anatomical structures visible within the wound: It's important to document normal anatomical structures that are visible in the wound, such as blood vessels, which are purplish in colour when healthy, and black or brown in colour when unhealthy, clogged, or calcified. Fat, which is yellow and globular when healthy and appears shrivelled, brown when unhealthy. Muscle, when healthy it's pink or dark red, striated, firm, and resilient to pressure. It may even jump or twitch when probed. When unhealthy, it appears brown, shrivelled, friable, and does not twitch. Tendons are white and shiny when healthy, and they're covered with a white tendon sheath. When unhealthy, the sheath will be frayed or stringy, and the tendon also will become yellow or brown. Ligaments and joint capsules have a similar appearance to tendons when healthy and unhealthy. Finally, bone is beige or tan, hard and covered with a clear membrane, the periostewhen it is healthy. When it is unhealthy, it is brown or black, and may also be friable and sort of disintegrate with palpation. Document the percentage of tissue types, colour, and consistency that you see in the wound. If you are not sure what type of tissue you're looking at, you can just describe what you see in terms of colour and percent. You can get a second opinion from someone else, or you can use digital photography.
- Wound drainage: When considering drainage or exudate, we want to look at both the type and amount. So wound exudate can provide you with a lot of information about the wound. Make note of drainage through the dressing before opening and cleansing, as well as the time since the last dressing change. After cleaning, and during treatment, once again, make note of any additional drainage that happens. There are four primary types of wound drainage, so sanguineous drainage, serous drainage, purulent drainage, and autolytic drainage. From there, there are two additional types of drainage that are combinations of these. We have serosanguineous drainage and seropurulent drainage.
Sanguineous drainage is blood that drains from surgical or acute wounds. It may also be seen after debridement or in patients that are prone to bleeding due to low platelet count or use of anticoagulants. Sanguineous or bloody drainage that does not slow or stop after a few hours, if it saturates bandages every few hours or if it starts again after stopping, can indicate fresh trauma to the wound, or that the patient may have been too active after surgery. The wound should be examined and there should be follow-up with a doctor. Serous drainage is the watery serum that normally appears during the inflammatory phase. It contains proteins but no blood cells or cellular debris. It is clear or slightly yellow in colour, and it's the fluid that you would typically see in blisters and also in drainage from venous insufficiency. Excess serous drainage is not normal. If copious, this can indicate trauma to the wound, chronic inflammation due to biofilm or localised infection. As the name suggests, serosanguineous drainage is a mix of serous and sanguineous drainage. It's thin, watery, and pale pink in colour. It typically occurs early in the healing process. If serous drainage changes to serosanguineous later in the healing process, it may indicate that there's a new trauma that's occurred to the wound.
Purulent drainage is the medical term for pus. Purulence is made up of white blood cells, dead bacteria, and other debris. It's almost always a sign of infection. It is foul-smelling, thick, and is yellowish-grey, brown, or green in colour. An infection with pseudomonas bacteria, in particular, will produce a characteristic green or greenish-blue colour. Presence of pus in the wound can increase the inflammatory response and worsen pain. Seropurulent drainage is when serous drainage starts to turn cloudy, yellow, or tan. So it's an indication that the wound is becoming colonised and may need changes to the treatment plan. Finally, autolytic drainage is the result of liquifaction of necrotic tissue and phagocytosis of bacteria. So it's typically thick and milky white to tan in colour. It can resemble seropurulent drainage in many ways. So while autolytic drainage often has an odour as well, it can be distinguished from the purulence of infection because after cleaning the wound, the odour typically does not linger and is not as offensive. With infection, even after cleaning the wound, the odour remains. And a lot of seasoned wound care providers will sniff the wound. If you aren't sure of drainage type, just document consistency. So thick, viscous, milky, or thin, and then include colour. Yellow, brown, clear, green, or greenish-blue.
Besides describing the type and colour of drainage that you see, also describe the amount of drainage. The terminology used to describe amounts is none, scant, minimal, moderate, heavy, and copious. None means both the dressing and the wound bed are dry. Scant means barely any drainage is visible on the side of the dressing next to the wound, or less than 25% of the dressing has visible drainage. No drainage visible on dressing removal, but the wound bed is moist. Minimal means drainage is visible on the inner side of the dressing only, and approximately 25 to 50% of the dressing has visible drainage. There may be some drainage on dressing removal, but no drainage is exposed during assessment or treatment. The wound bed is still very moist. Moderate means that drainage is visible on the inner side and a small amount on the outer side of the dressing. Approximately 50 to 75% of the dressing has visible drainage. Some drainage is visible on the wound bed after dressing removal, as well as some drainage occurs during treatment. The wound bed is wet. Heavy is when drainage is visible on both sides, inner and outer of the dressing. More than 75% of the dressing has visible drainage. The drainage is visible immediately after dressing removal, and continues throughout treatment. The wound bed is very wet. Copious is when the drainage is not contained by the dressing that was deemed appropriate for the wound at the time. So the dressing is a hundred percent soaked with drainage. It continues all throughout treatment, requiring continuous cleansing, suctioning, or in the case of bleeding, some pressure or thrombotic applications to reduce that bleeding. The wound bed is basically filled with fluid and saturated.
- Wound Odour: Next, you want to consider odour. So this can be a key component of your assessment, and with experience, you may learn to recognise implications of different odours. Odour does not necessarily mean that the wound is infected. Almost all wounds will have some odour on dressing removal. Odour is concerning if the smell lingers after dressing removal and after the wound has been cleaned. If you walk into a patient's room and can immediately smell a very strong odour, then infection can definitely be suspected in that case. Document the odour of the wound and not the odour from the topical agent, dressing, or the dressing by-product. If the previous dressing type is unknown, the wound odour can give you some clues as to what dressing was used. So if Dakin's solution was used, there will be a smell that's like bleach. If Burrow's solution was used, it may smell like vinegar, povidone-iodine or betadine will smell like iodine. And then hydrocolloid dressings will have a distinctive smell as a result of the chemical reaction from autolytic debridement. And you'll come to recognise and distinguish this from infective odours with practice.
- Periwound Skin: It's also important to assess the periwound skin as well as the wound. So you're going to start with assessing for any trophic changes, such as loss of hair, shiny skin, hair follicles are important for partial thickness wound healing since the hair follicles contribute the epidermal cells that are required for resurfacing. Hair needs a lot of blood supply to grow. So if a patient has hair on say, for example, their great toe or malleolus, then they likely have blood supply to this area. Skin discolouration, haemosiderin deposits are commonly seen in venous insufficiency. White spots called atrophie blanche are commonly seen with arterial disease or in healed wounds. A haematoma, purple ecchymosis, or something that looks like a really severe bruise signals a high probability of deep tissue destruction, and also the potential for enlargement of the wound. You may also see redness, darkening, purple spots, or other pigment changes that should be documented.
Maceration is softening of tissue by soaking in fluid until the connective tissue fibres are dissolved and then they can be just completely torn apart. This tissue appears white since it's lost its pigmentation, it's often soft and soggy. It is highly susceptible to trauma, so the wound is at high risk for enlargement. Induration is abnormal firmness of tissue with margins and sometimes has an orange peel appearance. Assess for induration within four centimetres of a wound edge by pinching the skin. If you're unable to pinch, you can palpate for induration. Hydration or turgor. Skin turgor or the elasticity of the skin assesses fluid loss or dehydration. Assess turgor by gently grasping the tissue on the back of the patient's hand, or even their foot, between your thumb and forefinger. Then release and look for a delay in tissue's return to normal. If the skin remains elevated, the patient has decreased turgor, and this is a late sign of dehydration. Next, look for hyperkeratosis or callus. This is overproduction of the stratum corneum due to repeated friction. It's commonly seen on an insensate foot from poorly fitting shoes or deformities.
Oedema delays healing. It may be due to the normal response that's seen in the inflammatory phase. It could be due to a dependent position, venous insufficiency, renal failure, or right-sided congestive heart failure. To assess oedema, take a circumferential measurement of the involved and uninvolved side at reproducible landmarks such as metatarsal heads, malleoli, or at designated spots above the lateral malleolus and at the lower edge of the patella. For circumferential measurements to be accurate, measurements should be taken in the same patient position and the same time of day, since oedema will vary from morning to late afternoon and also based on position. Besides measuring the oedema, you want to identify pitting versus non-pitting. Pitting oedema is assessed by pressing your finger into the skin for five seconds and then releasing your finger. If the indentation stays, it's termed pitting oedema. The pitting oedema severity scale can be found in the resources section for this course, that gets a bit more specific. Pitting oedema is often seen in congestive heart failure, venous insufficiency, and with DVTs. (deep vein thrombosis) Non-pitting oedema is stretched skin that is shiny and hard and is often seen in lymphoedema or angioedema. Although rare, sometimes lymphoedema may present as pitting, so the presence of pitting oedema does not rule this out.
- Blood flow. So first you're going to palpate the posterior tibial pulse and the dorsalis pedis pulse, and then document the presence and quality. Is there no pulse, barely felt, diminished, normal, bounding? If possible, perform the ankle brachial index and then document the result.
- Sensation. Test sensation using the Semmes-Weinstein monofilaments, and also assess light touch and pressure manually, heat/cold, and proprioception.
- Infection: When assessing for infection, think IFEE: induration, fever, erythema, and oedema. So certain infections have a characteristic odour. It can be hard to distinguish infection from the normal inflammatory response. Key characteristics of infection include streaks of redness, increased warmth, intense pain, significant oedema, exudate changes from serous to purulent, and then also a strong odour. Systemic characteristic of infection include fever greater than 38,3 degrees Celsius or 101 degrees Fahrenheit. Chills, lethargy, restlessness, and confusion. Reddened skin with streaks leading away from the wound may mean cellulitis or necrotising fasciitis, an infection of the surrounding tissues that can be life and limb threatening, and this requires immediate consultation with the physician.
- Wound culture. So if an infection is suspected, a swab culture may be ordered. And in most practice environments, a physiotherapist can perform a swab culture. Be sure to use the Levine technique when performing a swab culture, and a description of this can be found in the resources section. First, clean the wound with sterile water or saline. Then you want to swab over clean granulation tissue only. Do not culture eschar, slough, or other nonviable tissue since the non-viable tissue has bacteria, but then no blood supply. So those toxins cannot be absorbed and cause an infection. If you swab non-viable tissue this will result in a positive culture that does not necessarily correspond to an active infection. While swabbing, be sure to apply sufficient pressure to expel wound drainage from deep within the wound and collect that on the culturette.
- Joint biomechanical function, so you're going to want to look at joint passive and active range of motion, and then perform manual muscle testing, proximal and distal to the ulcer. Also perform any reflex testing of the involved extremity to assess for a neuropathy.
Wound Classification[edit | edit source]
Now let's get into wound classification. So during your wound evaluation, wounds are classified in several different categories. First of all, wounds are classified as either acute or chronic. Chronic wounds are wounds that have not finished the proliferative phase at the end of four weeks. So the wound is still open after four weeks, it's considered to be chronic. Wounds are also classified based on depth. And different wound types have different classification systems. A more thorough description of a few classification systems can be found in the resources section for this course. One way to classify depth is superficial, superficial partial thickness, deep partial thickness, and full thickness. Another common way to classify depth is based on the Bates-Jensen Wound Assessment Tool. Pressure injuries or pressure ulcers are staged using a system developed by the National Pressure Injury Advisory Panel, formerly known as the National Pressure Ulcer Advisory Panel. It's important to note that this staging system is only used for pressure injuries and not other types of wounds. So sometimes people will try to stage a different type of wound, and that's not accurate.
Let's do a quick review of common characteristics of leg ulcers for classification. So arterial ulcers are most often caused by arteriosclerosis. They're very painful, located on the distal lower extremity, usually the lateral lower leg or on the toes, and have a regular pale wound base. Venous ulcers are most often caused by venous insufficiency. They're located in the medial leg or gaiter area. Pain is milder and the wounds have irregular edges. They're shallow and have a pink or a red wound base. Neuropathic ulcers are most commonly seen in people with diabetes, and there's usually no pain due to neuropathy, although occasionally there will be pain sensations in the limb that is unrelated to the wound itself. The wounds are located on the plantar surface of the foot and can often present as callus. It's not uncommon to have wounds that are a combination of these types.
And that is all that I have for this course. I appreciate your time and I hope that you take the opportunity to complete the lab assignment that's associated with this course so that you can have a chance to practise your measurement and assessment skills. If you're interested in delving deeper into any of these areas, I really recommend that you follow up with a more advanced mentorship that can help to address practical assessment of these types of wounds. Thorough wound assessment requires you to look at many different factors and just like other specialties of physiotherapy, knowing which areas need attention comes with practice and experience, and it's really hard to address in one online course, so I encourage you to go further with that.
Sub Heading 3[edit | edit source]
Resources[edit | edit source]
- So you'll get a chance to practise measuring and making a wound tracing during the lab portion for this course.
- x
or
- numbered list
- x
References[edit | edit source]
- ↑ YouTube. Principles of Draping Patients for Physical Exams. Available from: https://www.youtube.com/watch?v=Q6oCdxISRCE&t=85s [last accessed 13 Feb 2023]
