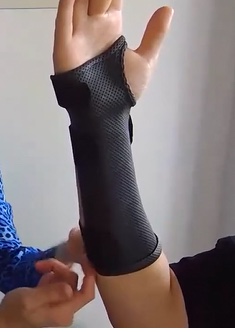
Fabricating a Volar Extension Splint for Colles' Fracture
Introduction[edit | edit source]
Distal radius fractures (also know as Colles Fractures) are usually the result of a fall on an outstretched hand. In children and young adults, the force required for this sort of fracture is much higher (eg a fall off monkey bars or a car accident) whereas in older adults distal radius fractures tend to occur following a low energy fall from a standing height.[1]
Some distal radius fractures are managed conservatively, but many will require surgical fixation. You can read detailed post operative protocols for Colles’ fractures fixed with open reduction internal fixation (ORIF) here (0-6 weeks post op) and here (beyond 6 weeks post op).
After ORIF patients will need a volar distal orthosis fitted day one post surgery. These splints are preferable to a circumferential splint as they are easier to take on and off.[2] As this patient group have had ORIFs to stabilise their fracture, there is no need for them to be fully immobilised.[3][4] The splints are primarily used for protection (ie in case of fall or a blow to wrist).[2]
Here we outline a simple method of fabricating this splint:
Required Materials[edit | edit source]
- Thermoplastic sheet in basic rectangle template – length is based on the distance from the patient’s MCP joints to around two thirds of the length of the his/her forearm
- Frying pan
- Splinting sheers
- Egg flipper
- Looped Velcro straps x 3
- Sticky backed hooks x 3
Method[edit | edit source]
1. Take the thermoplastic sheet and place it into hot water in the frying pan. This will make it soft and malleable. Please check the temperature before putting the sheet onto the patient’s skin to avoid burns.
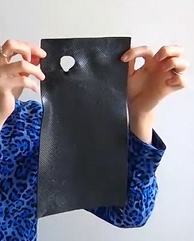
2. Once the thermoplastic sheet is softened enough, cut the thumb hole. First pierce the material with your scissors and cut out a small circle. As a general rule, the thumb hole should be around 3cm from the top of the sheet and 3cm in from the side (see figure 1).
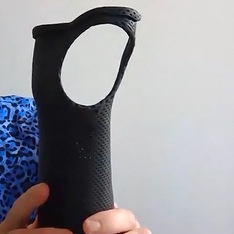
3. Place the thermoplastic sheet back into the warm water and roll out the edges of the thumb hole to make sure it will be comfortable and smooth when worn (see figure 2).
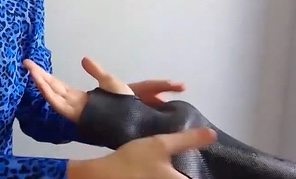
4. Place the splint on your patient’s hand. Hook the thumb hole around their thumb and mould the plastic around their forearm and through the curvature of their hand. It is best if you sit opposite your patient, with their elbow resting on the table (see figure 3). Remember to check that:
- The end of the splint is below the MCP crease distally, so the patient will be able to achieve full finger flexion
- The area between the thumb and index finger is flat and thin, so that the thumb won’t get any pressure areas, when moving into abduction
- The thumb area is large enough to ensure that there is no rubbing on the CMC joint and to achieve full opposition between thumb and little finger
- The patient is in slight wrist extension when fitting the splint – usually 10-15 degrees
5. Once the plastic has dried and hardened (which usually occurs very quickly), the splint is ready to be trimmed down to fit the patient. Remember the splint should reach 2/3 of the forearm length and the sides should be trimmed so that the splint sits at around ¾ depth of the forearm.
6. Flare out the area around the ulnar styloid to avoid any pressure/rubbing in this area.
7. Place the splint back into frying pan, so that you can roll the bottom and top edges to make it smooth on the edges for comfort (see figure 2).
8. Add velcro straps to the splint, starting with the most distal strap (which should be the thinnest strap at 2cm wide). This strap should be positioned on a slight diagonal angle (ie place it on a downward tilt). For longevity of the splint, try using a heat gun to heat the backing of the hook onto the splint.
9. Add the middle strap (which should be 3cm wide) straight across the back of the wrist.
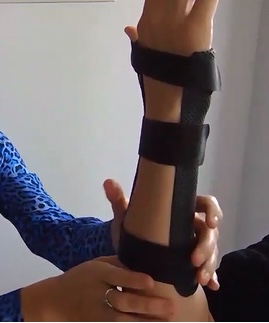
10. The final strap rests at the proximal end of the splint. This strap should be positioned on a slight upward angle, so that it will sit flat when the splint is applied (see figure 4).
11. Place the splint on the patient’s arm. Remember to check:
- The distances at the MCP
- That the splint clears the CMC joint
- That the wrist is slightly extended
- That the straps are firm, without being too tight (see figure 5)
12. Trim the straps down to fit the patient. Round the edges of the straps and Velcro hooks to stop them catching on clothing.
13. It is often useful to provide tubigrip or a splint sock that is worn under the splint to reduce rubbing/sweating. This will help with comfort and may increase compliance around splint use.[2]
References[edit | edit source]
- ↑ Handoll HHG, Huntley JS, Madhok R. External Fixation versus conservative treatment for distal radial fractures in adults (Review). The Cochrane Library. 2008;4:1-78
- ↑ 2.0 2.1 2.2 Thorn, K. Introduction to distal radius fracture [VIMEO]. Queensland: Physiopedia, 2019.
- ↑ Foster BD, Sivasundaram L, Heckmann N, Pannell WC, Alluri RK, Ghiassi A. Distal Radius Fractures Do Not Displace following Splint or Cast Removal in the Acute, Postreduction Period: A Prospective, Observational Study. J Wrist Surg. 2017;6(1):54–59.
- ↑ Andrade-Silva FB, Rocha JP, Carvalho A, Kojima KE, Silva JS. Influence of postoperative immobilization on pain control of patients with distal radius fracture treated with volar locked plating: A prospective, randomized clinical trial. Inquiry. 2019;50(2):386-391.
